Chào toàn thể anh em, hôm nay chúng ta sẽ tìm cách đưa model Tiny Yolo v3 lên Pi 3 xem cái kết nó như nào nhé?
Bữa trước mình đã có một series về CV và Pi trên Mì Ai:
- Bài 1: Computer Vision & Pi – Chương 1. Cài đặt môi trường lập trình cho Raspberry Pi
- Bài 2: Computer Vision & Pi – Chương 2. Triển khai model AI nhận diện đối tượng MobileNet SSD lên Raspberry Pi
- Bài 3: Computer Vision & Pi – Chương 3. Lắp đặt Pi trên xe hơi để phát hiện tài xế ngủ gật
- Bài 4: Computer Vision & Pi – Chương 4. Train model Tiny YOLOv3 để xem có đưa lên Pi được không?
Hôm nay chúng ta sẽ làm tiếp theo nội dung bài 4 đó là sẽ đưa model Tiny Yolov3 lên trên Pi xem điều gì xảy ra nhé.
Mình có mượn model Tiny Yolo v3 của bạn Hiếu để tiết kiệm thời gian train model.
Phần 1 – Chuẩn bị môi trường cho Pi
Nếu các bạn không dùng môi trường ảo, cài trực tiếp vào Pi thì sẽ dẫn đến khả năng bị lỗi và các bạn phải cài lại OS cho Pi. Điều đó tốn khá nhiều thời gian và công sức.
Do vậy mình khuyến khích các bạn hãy tạo môi trường ảo bằng Bài số 1 ở trên kia. Nhớ kích hoạt (activate) sau khi cài xong và mỗi lần chạy ứng dụng nhé.

Phần 2 – Chạy thử model Tiny Yolo v3 trên Pi
Đầu tiên các bạn tạo một thử mục trên Pi, ví dụ MiAI_Tiny_YOLO sau đó các bạn chuẩn bị đầy đủ các file sau trong thư mục đó:
- File tiny-yolov3.cfg: Chính là file các bạn sử dụng trong quá trình train. Phải dùng đúng file đã train, lấy file khác vào mà không chỉnh tham số sẽ lỗi nhé.
- File yolo.names: Cũng lấy luôn file đã train.
- File weights train được: Chính là file yolov3-tiny.backup hoặc yolov3-tiny_<số vòng train>.weights đều được nhé.
Ở đây mình có up sẵn các file này dành cho bạn nào chưa train và muốn thử nghiệm nha. Tải tại đây!
Rồi bây giờ các bạn tạo tiếp 1 file YOLO-tiny.py và copy đoạn code sau vào:
import time
import cv2
import argparse
import numpy as np

ap = argparse.ArgumentParser()
ap.add_argument('-i', '--image', required=True,
                help='path to input image')
ap.add_argument('-c', '--config', required=True,
                help='path to yolo config file')
ap.add_argument('-w', '--weights', required=True,
                help='path to yolo pre-trained weights')
ap.add_argument('-cl', '--classes', required=True,
                help='path to text file containing class names')
args = ap.parse_args()


def get_output_layers(net):
    layer_names = net.getLayerNames()

    output_layers = [layer_names[i[0] - 1] for i in net.getUnconnectedOutLayers()]

    return output_layers


def draw_prediction(img, class_id, confidence, x, y, x_plus_w, y_plus_h):
    label = str(classes[class_id])

    color = COLORS[class_id]

    cv2.rectangle(img, (x, y), (x_plus_w, y_plus_h), color, 2)

    cv2.putText(img, label, (x - 10, y - 10), cv2.FONT_HERSHEY_SIMPLEX, 0.5, color, 2)


image = cv2.imread(args.image)

Width = image.shape[1]
Height = image.shape[0]
scale = 0.00392

classes = None

with open(args.classes, 'r') as f:
    classes = [line.strip() for line in f.readlines()]

COLORS = np.random.uniform(0, 255, size=(len(classes), 3))

net = cv2.dnn.readNet(args.weights, args.config)

blob = cv2.dnn.blobFromImage(image, scale, (416, 416), (0, 0, 0), True, crop=False)

net.setInput(blob)

outs = net.forward(get_output_layers(net))

class_ids = []
confidences = []
boxes = []
conf_threshold = 0.5
nms_threshold = 0.4

# Thực hiện xác định bằng HOG và SVM
start = time.time()

for out in outs:
    for detection in out:
        scores = detection[5:]
        class_id = np.argmax(scores)
        confidence = scores[class_id]
        if confidence > 0.5:
            center_x = int(detection[0] * Width)
            center_y = int(detection[1] * Height)
            w = int(detection[2] * Width)
            h = int(detection[3] * Height)
            x = center_x - w / 2
            y = center_y - h / 2
            class_ids.append(class_id)
            confidences.append(float(confidence))
            boxes.append([x, y, w, h])

indices = cv2.dnn.NMSBoxes(boxes, confidences, conf_threshold, nms_threshold)

for i in indices:
    i = i[0]
    box = boxes[i]
    x = box[0]
    y = box[1]
    w = box[2]
    h = box[3]
    draw_prediction(image, class_ids[i], confidences[i], round(x), round(y), round(x + w), round(y + h))

cv2.imshow("object detection", image)


end = time.time()
print("YOLO Execution time: " + str(end-start))


cv2.waitKey()

cv2.imwrite("object-detection.jpg", image)
cv2.destroyAllWindows()Code language: PHP (php)
Save file đó, copy vào Pi và cài đặt các thư viện cần thiết như:
- pip install opencv-python
và chạy lệnh:
python YOLO-tiny.py -i gun.jpg -cl yolov3.names -w yolov3_tiny.backup -c yolov3-tiny.cfgCode language: CSS (css)Trong đó các bạn chú ý thay đổi các tham số cho phù hợp:
- -i gun.jpg: Chuyển đến file ảnh bạn cần nhận diện
- -w yolov3_tiny.backup: Cũng trỏ đến file weights của bạn muốn dùng
- -c và -cl thì là trỏ đến file names và config rồi 😉
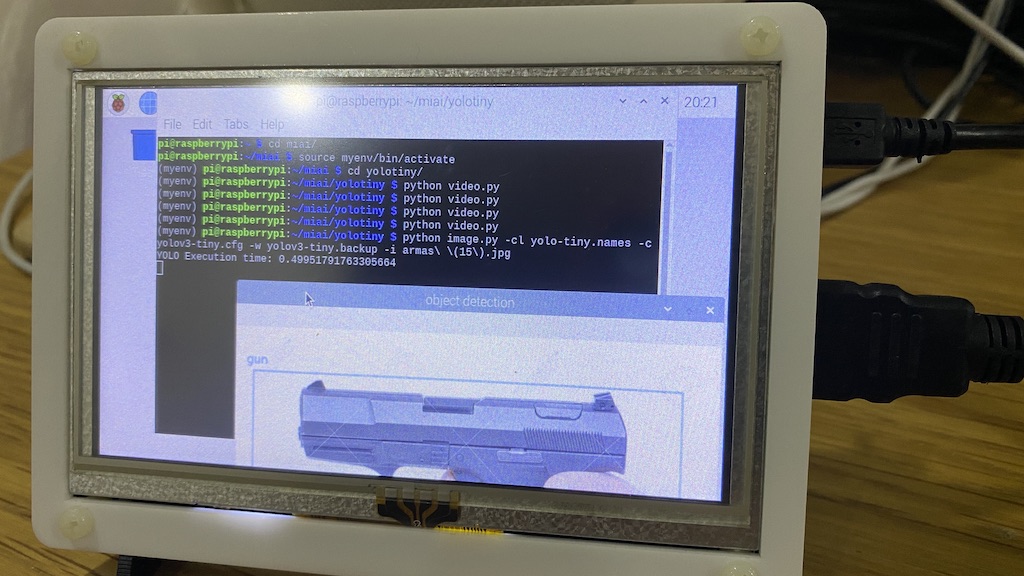
Nếu như thành công thì một cửa sổ cũng hiện lên như bao bài khác
Và điều đó chứng tỏ là Pi3 chạy được Tiny Yolov3, thời gian inference tầm: 0.5 s.
Bây giờ, để tăng độ máu, mình sẽ thử cho Pi 3 chạy detect realtime trên camera xem điều gì xảy ra nhé 😀
Mình sẽ tạo thêm một file mới, có tên là YOLO-tiny-video.py và paste đoạn source sau vào:
import time
import cv2
import argparse
import numpy as np
from imutils.video import VideoStream
import imutils

# Cai dat tham so doc weight, config va class name
ap = argparse.ArgumentParser()
ap.add_argument('-c', '--config', default='yolov3-tiny.cfg',
                help='path to yolo config file')
ap.add_argument('-w', '--weights', default='yolov3-tiny.backup',
                help='path to yolo pre-trained weights')
ap.add_argument('-cl', '--classes', default='yolo-tiny.names',
                help='path to text file containing class names')
args = ap.parse_args()

# Ham tra ve output layer
def get_output_layers(net):
    layer_names = net.getLayerNames()
    output_layers = [layer_names[i[0] - 1] for i in net.getUnconnectedOutLayers()]
    return output_layers

# Ham ve cac hinh chu nhat va ten class
def draw_prediction(img, class_id, x, y, x_plus_w, y_plus_h):
    label = str(classes[class_id])
    color = COLORS[class_id]
    cv2.rectangle(img, (x, y), (x_plus_w, y_plus_h), color, 2)
    cv2.putText(img, label, (x - 10, y - 10), cv2.FONT_HERSHEY_SIMPLEX, 0.5, color, 2)

# Doc tu webcam
cap  = VideoStream(src=0).start()

# Doc ten cac class
classes = None
with open(args.classes, 'r') as f:
    classes = [line.strip() for line in f.readlines()]

COLORS = np.random.uniform(0, 255, size=(len(classes), 3))
net = cv2.dnn.readNet(args.weights, args.config)


# Bat dau doc tu webcam
i=1
while (True):

    # Doc frame
    frame = cap.read()
    image = imutils.resize(frame, width=320)
    i+=1
    if i%10==0:
        # Resize va dua khung hinh vao mang predict
        Width = image.shape[1]
        Height = image.shape[0]
        scale = 0.00392
        blob = cv2.dnn.blobFromImage(image, scale, (416, 416), (0, 0, 0), True, crop=False)
        net.setInput(blob)
        outs = net.forward(get_output_layers(net))

        # Loc cac object trong khung hinh
        class_ids = []
        confidences = []
        boxes = []
        conf_threshold = 0.5
        nms_threshold = 0.4

        for out in outs:
            for detection in out:
                scores = detection[5:]
                class_id = np.argmax(scores)
                confidence = scores[class_id]
                if (confidence > 0.5):
                    center_x = int(detection[0] * Width)
                    center_y = int(detection[1] * Height)
                    w = int(detection[2] * Width)
                    h = int(detection[3] * Height)
                    x = center_x - w / 2
                    y = center_y - h / 2
                    class_ids.append(class_id)
                    confidences.append(float(confidence))
                    boxes.append([x, y, w, h])

        indices = cv2.dnn.NMSBoxes(boxes, confidences, conf_threshold, nms_threshold)

        # Ve cac khung chu nhat quanh doi tuong
        for i in indices:
            i = i[0]
            box = boxes[i]
            x = box[0]
            y = box[1]
            w = box[2]
            h = box[3]

            draw_prediction(image, class_ids[i], round(x), round(y), round(x + w), round(y + h))


        cv2.imshow("object detection", image)
    if cv2.waitKey(1) & 0xFF == ord('q'):
        break

cap.stop()
cv2.destroyAllWindows()Code language: PHP (php)
Và bây giờ thử xem nào 😀
python YOLO-tiny-video.pyCode language: CSS (css)Ngon ra phết. Tất nhiên không thể nhanh và realtime được rồi.
Okie, như vậy mình đã hướng dẫn các bạn đưa Yolo lên Pi, các bạn thử và comment kết quả nhé. Hẹn gặp lại các bạn trong các bài khác tiếp theo.
Chào tạm biết và chúc các bạn thành công!
Hãy join cùng cộng đồng Mì AI nhé!
Fanpage: http://facebook.com/miaiblog
Group trao đổi, chia sẻ: https://www.facebook.com/groups/miaigroup
Website: https://miai.vn
Youtube: http://bit.ly/miaiyoutube
Bài viết khá chi tiết
Cũng đúng dịp em đang tìm hiểu
Cảm ơn về bài viết của anh!
Cảm ơn em đã ủng hộ nha. Em join cộng đồng Mì AI nha!
#MìAI
Fanpage: http://facebook.com/miaiblog
Group trao đổi, chia sẻ: https://facebook.com/groups/miaigroup
Blog: https://miai.vn
Youtube: http://bit.ly/miai_youtube
Cám ơn anh….nhóm em cũng đang tìm hiểu về nội dung này….anh có thể cho thông tin để nhóm chúng em mời anh bữa coffee ạ !
Hihi. Giúp ích cho bọn em là anh vui rồi. Em join cùng cộng đồng Mì Ai là sự ủng hộ lớn nhất cho anh rồi. Còn lại hẹn ngày offline nha!
#MìAI
Fanpage: http://facebook.com/miaiblog
Group trao đổi, chia sẻ: https://facebook.com/groups/miaigroup
Blog: https://miai.vn
Youtube: http://bit.ly/miai_youtube
A cho e hoi chay realtime thi tam bao nhieu fps z a?
Anh cũng chưa đo. Em tải về đo thử xem và share cùng cả nhà nhé.
#MìAI
Fanpage: http://facebook.com/miaiblog
Group trao đổi, chia sẻ: https://facebook.com/groups/miaigroup
Blog: https://miai.vn
Youtube: http://bit.ly/miai_youtube
Anh Ơi cho em hỏi cái là tại sao ở dòng 36: ” open(args.classes, ‘r’) as f:” thì trên Pi4 của em nó báo lỗi: No Such File or Directory: “Yolo-tiny.names ” vậy anh? em không biết cách fix chổ này mong anh giúp em với. Em xin cảm ơn ạ
Em bị thiếu file thôi. Em check xem file đó đang ở đâu. Có gì post lên Group: https://www.facebook.com/groups/miaigroup cho tiện trao đổi nhé!
Em chào anh, cho em hỏi em làm giống như bài viết của anh nhưng nó lại báo lỗi là
error: (-215:Assertion failed) separator_index < line.size() in function 'cv::dnn::darknet::ReadDarknetFromCfgStream'.
em xài yolov4, opencv 4.0.1, python 3.8 ạ
Em cám ơn anh.
Em post lên Group trao đổi, chia sẻ: https://facebook.com/groups/miaigroup xem nhé!